Saturday, 2 March 2019

Vada Pav

Vada Pav

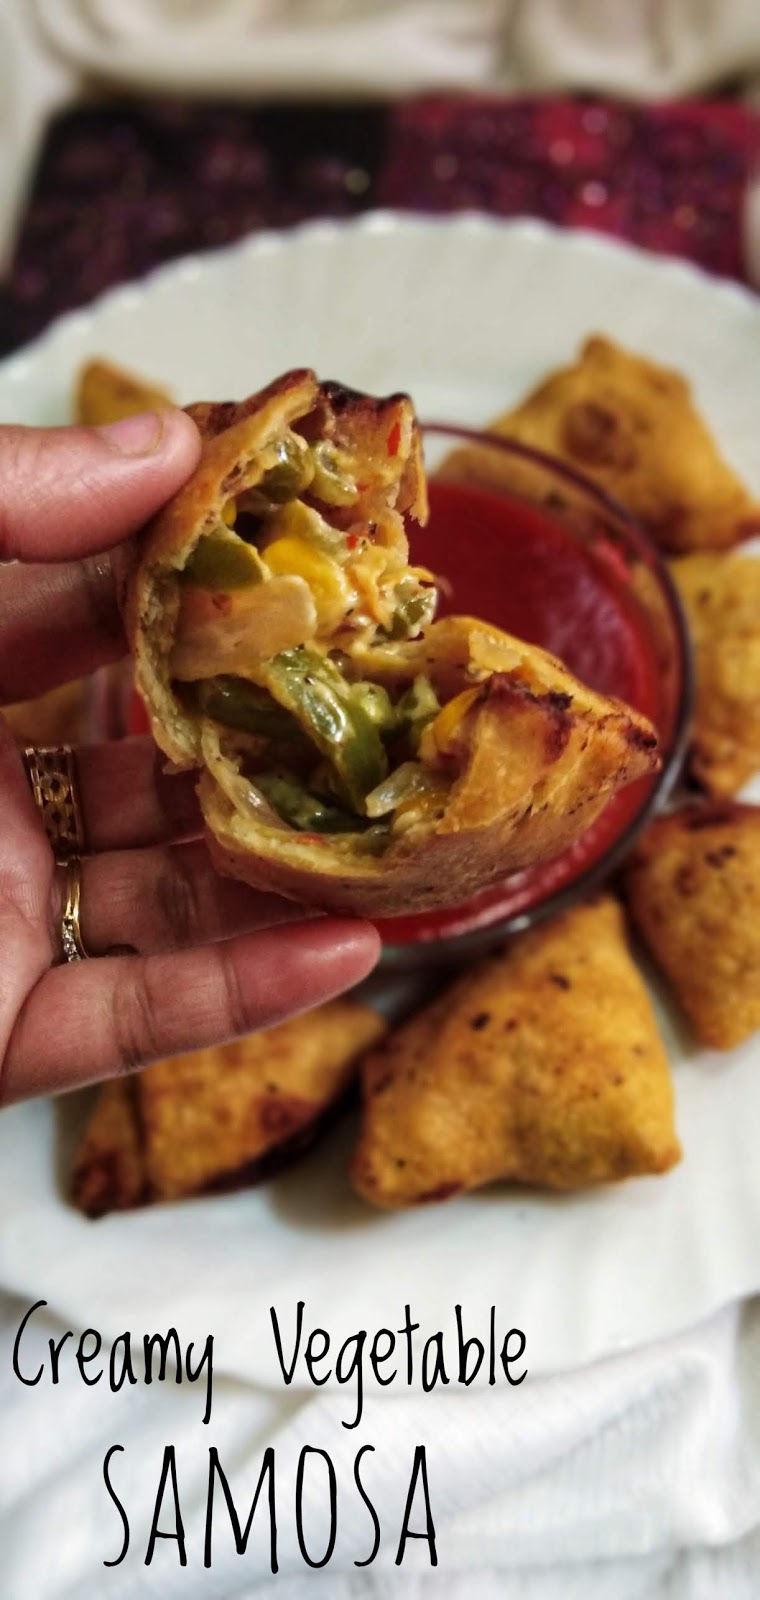
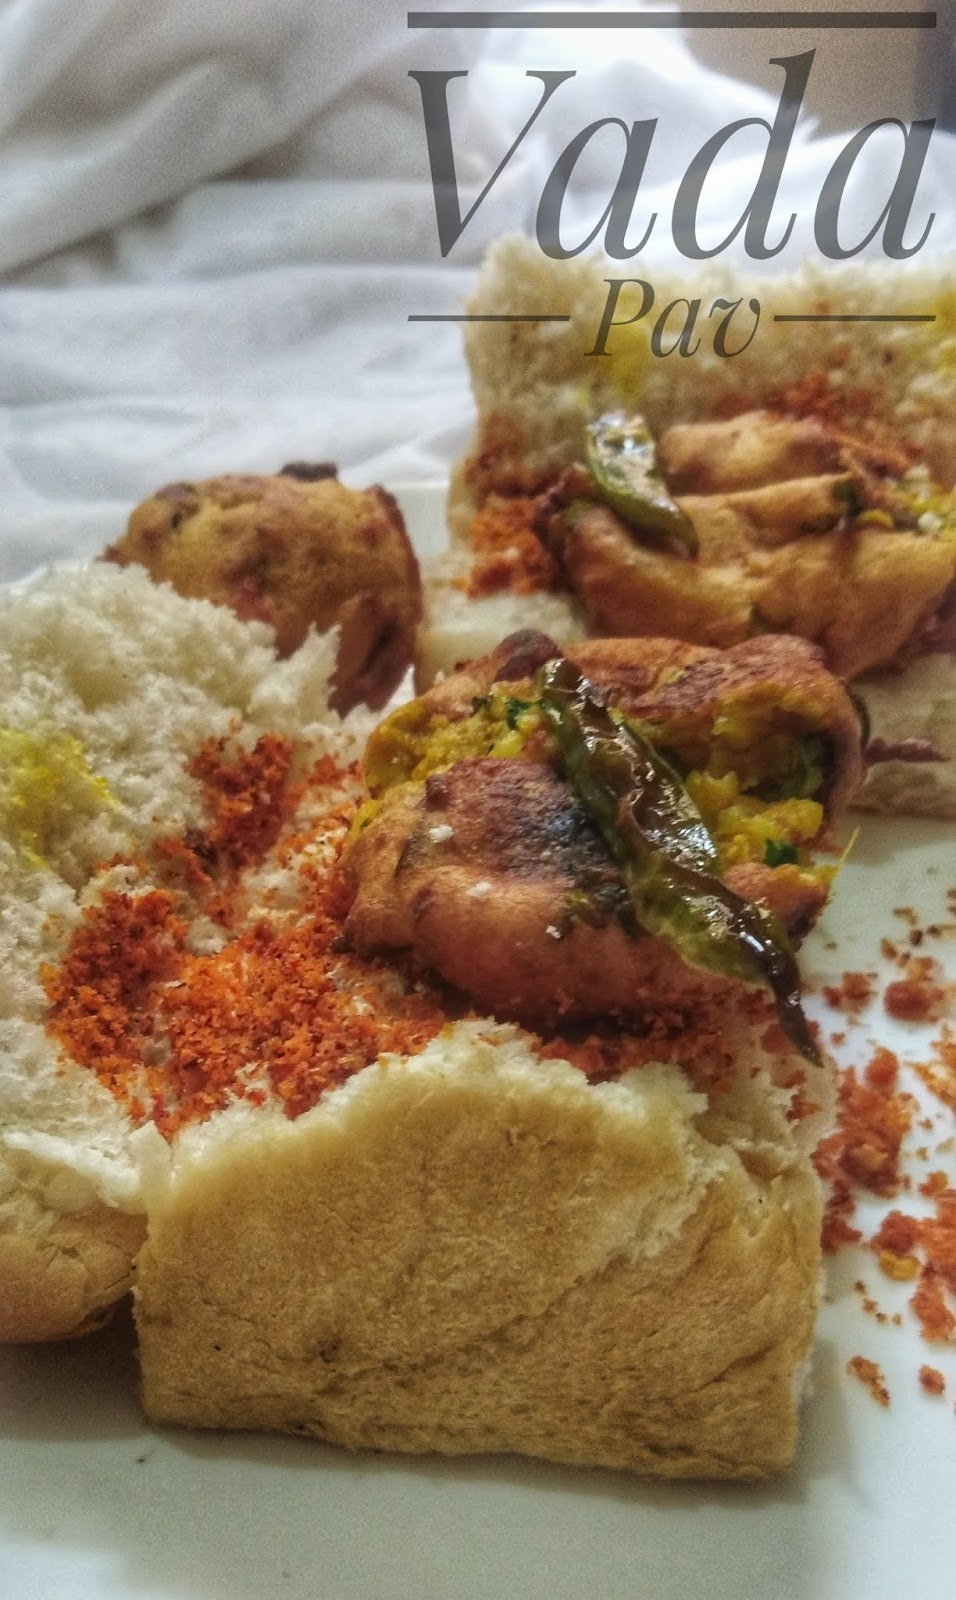
Vada Pav is a vegetarian fast food dish native to the Indian state of Maharashtra.This dish is consists of fried potato dumpling placed inside the bun. Vada pav is incomplete without it's special dry powdered garlic chutney and fried green chillies. Vada pav known as Bombay Burger is a very popular cheap street food in Mumbai.
But if you are not Mumbai Based foodie than you can try out this recipe and enjoy these crispy vadas at home also.Oh Yes! I remember a story,when i was in 10 th standard i went to Mumbai with my Mum Dad and the first food we came across in Mumbai is Vada pav and after eating this i became a fan of Mumbai's Vada pav ;-) After coming back to Delhi i insisted my Mom that i want to go back again to Mumbai :-D and When my mom asked my why then i seriously cried out for Vada Pav...HeHe! Sounds funny Nah?But every Mom is an expert of handling their kids ,so my Mom went to kitchen and made vada pavs for me and believe me that was the happiest moment for me,that being a Delhiite i got the same taste of Mumbai's vada Pav :-P   
Vada pav is also known as Batata Vada ,which means potato fritters.The deep fried vada coated with gram flour satisfies your hunger too.You can add these vada pavs in your breakfast or in your evening snack too.


The most favourite part of vada pav is the dry garlic peanut powder.I have made this at home only and believe me its too yum that you can have this with ghee rice also.
You can enjoy the vada pav in your house parties also,as its easy to make and it will definitely gonna be loved by your friends :-)
You can also give this to your children in their evening snacks as kids always demand for some fried food ,so its a good option for your kids.
So here goes the full recipe of Vada pav and Garlic Peanut chutney - 


Ingredients -
For Vada-

  1. 3 boiled potatoes medium sized
  2. 1 cup gram flour (besan)
  3. Salt as per taste
  4. Turmeric Powder - 1/2 tsp
  5. Red chilli powder -1 tsp
  6. Coriander powder - 1 tsp
  7. Dry mango powder - 1 tsp (optional)
  8. Curry Patta - 5 to 6 leaves
  9. Rai known as Mustard Seeds - 1 tsp
  10. Handful of Fresh Coriander leaves
  11. Ginger,garlic and green chilli paste around 1 tsp(you can make fresh paste)
  12. 1 tsp lemon juice
  13. Oil for frying
For Garlic peanut Chutney -
  1. Garlic cloves - 6 to 8
  2. Peanuts - 2 tsp
  3. Coconut Powder - 50 grams
  4. Dry red chillies - 6 to 7
  5. Salt as per taste
  6. Dry mango powder - 1/2 tsp (optional)
  7. Red chilli powder - 1 tsp (you can use degi mirch if you don't want much spicy)


Method -
  1. Take a bowl add boiled potatoes and crumble them with your fingers.
  2. Now take a wok add 2 tsp oil heat it up.
  3. Now add Rai and let it splutter.
  4. Add Curry leaves and roast it.
  5. Add ginger,chilli,garlic paste and saute it for 1 minute.
  6. Then add potatoes and mix it well.
  7. Add salt,coriander powder,dry mango powder,turmeric powder and red chilli powder.
  8. Mix it very well for 4 to 5 minutes.
  9. Add coriander leaves and mix it also.
  10. Keep the mixture aside.
  11. Now take a deep wok add oil and heat it up nicely.
  12. Take a bowl add gram flour with some salt and red chilli powder.
  13. Mix the dry ingredients and add water in it.
  14. The batter should not be thick neither watery.
  15. Now add lemon juice in the batter (this will make your vada more crispy)
  16. Now take the mixture of potatoes and make small ball and dip it in gram flour.
  17. Deep fry them in the oil.
  18. Follow the same procedure for the rest of the mixture.
  19. Your Vada is ready,Take the pav and cut it in half spread dry chutney from the centre and place your vadas in between.
Recipe for Dry Garlic Peanut chutney -
  1. Take a wok add 1 tsp oil add red chillies and garlic fry them for 2 minutes and take them out.
  2. Now add peanuts and fry them till they get lightly roasted.Take them out too.
  3. Now add coconut powder and roast it till it changes it colour.
  4. Take it out.
  5. Now take a mixer jar and add Red chillies,coconut powder,peanuts,salt,mango powder and red chilli powder.
  6. Grind it .
  7. Do not add water.
  8. Your garlic peanut chutney is ready to enjoy.


Monday, 11 February 2019

Creamy Vegetable Samosa

Creamy Vegetable Samosa
Samosa is my childhood buddy :-P and now also.I love to have samosa in evening with my cup of tea.Samosa comes in various variety of yummy fillings like one of the most common and easily available Aloo samosa but now days there are many more innovative forms like  Chowmein samosa,Cheese Samosa, Manchurian Samosa,Pasta Samosa and if you have a sweet tooth,then you can also enjoy Chocolate Samosa too :-D
Yes it sounds interesting Na?
I have tried this Creamy Vegetable samosa which is very different in taste.Its filled up with the goodness of vegetables and its really creamy from inside and crispy outside.


So if you are a samosa lover but you avoid them eating because of the unhealthy oil ,so you must try this out because Home made food is the best.Freshly made crispy samosa with a fresh healthy filling is absolutely perfect for your evening cravings :-)
One day I was sitting idle and suddenly i saw a random video about different variety of samosas and as you all know Am a big  Foodie and I was not able to wait to place the order but I found this shop was not taking the orders :-( saddest part of my food story ...But being a true foodie I thought to give a try to make samosa .So I rushed to my kitchen and experimented with my innovative Samosa and believe me it was too tempting,if you won't believe me ,then do try out this recipe just once and I am very much sure that you will make this again too :-)


 So here goes the yummy crispy recipe of  Creamy vegetable Samosa -
Ingredients -
For Dough-


  • 2 cups all purpose flour
  • 1 tbsp semolina
  • Salt 1 tsp
  • Refined oil - 2 tbsp
  • Water as required for kneading the dough


    1. Boiled american corns - 1/2 a cup
    2. Boiled peas -1/2 a cup
    3. Onion thinly sliced - 1 medium sized
    4. Capsicum - finely sliced -1 medium sized
    5. Crushed Garlic - 4 to 5 cloves
    6. Mayonnaise - 2 tbsp or more 
    7. Tomato ketchup - 1 tbsp
    8. Sugar - 2 pinches
    9. Dry mango powder -1/2 tsp
    10. Salt as per taste
    11. Oregano flakes according to your taste
    12. Chilli flakes ( optional)

    Method -

    1. Take a bowl add apf,semolina and salt and mix it well.
    2. Now add oil in it.
    3. Mix it really well with your fingers.
    4. HOW to check the right form that how much oil needs to be added ?Check this picture-
    As you can see a good shaped lump with only dry ingredients and ghee,So if you are able to form this it means that now you can add water and knead the dough.


    See the dry ingredient lump is shown in the picture.
    So gradually start adding water and make a normal dough nor too soft neither very hard.
    Knead the dough for at least 7 to 8 minutes.

    5 . Now keep the dough for rest for 15 minutes by covering it with a cloth or plate.


    For Stuffing -
    1. Take a wok add 1 tsp oil and heat it up.
    2. Now add onions and fry them till they turn translucent in colour.
    3. Now add salt in it.
    4. Add capsicum,boiled peas ,garlic and peas.
    5. Saute it for few minutes till they turn little soft. 
    6. Now add mango powder,sugar,ketchup and oregano.Mix it well.
    7. When your vegetables will turn soft take them out in a bowl.
    8. Add mayonnaise and red chilli flakes and mix it with a spoon .keep aside.
    9. Heat up the oil in a kadhai.
    10.  Now with the kneaded dough take a portion and make a small ball from it and divide the dough .
    11. Now take 1 ball and dusk some dry all purpose flour and roll the ball with the help of a roller pin spread the ball in thin shape equally in a big oval shape
    12. Now divide the oval shape in two parts and cut it with the help of a knife.
    13. Take a bowl of water and spread some water at the edges and fold the sides on one upon the other to seal the samosa.
    14. Now you will get a triangle shape and fill the filling and seal the samosa from the top.
    15. Deep fry the samosa on a medium flame for 10 to 12 minutes and flip it time to time.
    16. Once they turn golden in colour,place your samosas on an absorbent paper and serve it hot with your favourite dip.
    17. Enjoy :-) Happy Cooking !


    Friday, 8 February 2019

    Moong Daal Ki Pakodi

    Moong Daal Ki Pakodi

    Moong daal ki Pakodi also known as Moong daal bhajiya is a popular snack from Mumbai.Deep fried fritters are just perfect for
    rainy weather,as we all enjoy these types of munchies like samosa ,pakoras or bhajiyas. These pakodas are made from yellow moong daal lentils and they are mild spicy but does have really beautiful aromatic flavour.
    These pakodas are crispy from outside and soft from inside.You can enjoy this Moong Daal Ki Pakodi in your breakfast too.In India, Moong  daal is commonly used in variety of dishes like Moong daal khichri,halwa or just as a simple Zeera Heeng Wali Moong Daal!
    This Moong daal is low in fat and rich in B Complex vitamins,calcium and potassium.Its a light daal ,which is free from heaviness and flatulence.


    So if you are looking for a healthy snacking for your kids or even adults,then you must try out this crispy Moong Daal pakodi.
    The most easiest and light fried bhajiyas to be enjoyed with Ketchup or dhaniya mirchi chutney is the best combo to relish specially in winters or rainy season.
    Hot Bhajiyas with a cup of tea and with some good music is heaven :-P 


    So here goes the tempting recipe of Moong Daal Ki Pakodi-

    Ingredients -

    1. Yellow Moong Daal - 250 Grams
    2. Semolina (moti Wali sooji )-1 tsp (Optional)
    3. Green chillies - 2 to 4
    4. Red chilli powder - 1/2 tsp
    5. Ginger -1/2 inch
    6. Fresh leaves of Green Coriander - 1/2 a cup(finely chopped)
    7. Salt as per taste
    8. Oil for deep frying


    Method -

    1. Soak the daal for atleast 3 to 4 hours.
    2. After 4 hours drain the excess of water, add the daal in the grinder.
    3. Add ginger,green chillies and red chilli powder and make a fine paste .You can add water if required.
    4. Now time to add semolina ,coriander leaves and salt in the batter.
    5. Mix it well for few minutes.
    6. Now take a deep wok add oil and heat it up.
    7. Drop spoonful of  batter in the hot oil.
    8. Fry it first on high flame and later on a medium flame,till they turn out crispy and golden in colour.
    9. Place your pakodis on an absorbent paper and enjoy them with your freshly made chutney or ketchup.
    10. Happy Cooking :-) 

    Thursday, 10 January 2019

    Chocolate Swirl Bread/Babka Bread

    Chocolate Swirl Bread / Babka Bread

    Do you have a sweet Tooth?Are you craving for a delicious chocolatey dessert ?So give a try to this Babka Bread! A sweet leavened bread made with a rich melted chocolate filled dough would definitely satisfy your sweet cravings.Its basically a traditional cake ,which is being made on special occasions ,specially on Christmas or Easter Sunday to celebrate the rising of Christ
    This bread is made from eggs but i have made it egg less means a pure veg bread which has risen up so well and it tastes heaven!


    This is my first try on baking a sweet bread ,though i have tried many savoury breads and it tastes amazing ,but this bread is now in one of my favourites list because i love eating sweet dishes.This bread is not too sweet ,as the bread is balancing the taste of chocolate.I have used @Hershey's Choco Spread but you can use any chocolate its up to you.
    So a must try recipe is here on my blog.Do give a try -


    Ingredients -


    1. All purpose flour -2 and 1/2 cup
    2. Dry active yeast -1 and 1/2 tbsp
    3. Warm milk - 1 1/2 cup
    4. Soft yellow butter -2 tbsp
    5. Sugar - 2 tbsp
    6. Chocolate spread 

    Method -
    1. Take a small bowl and add yeast and sugar in it mix it with a spoon.
    2. Now add warm milk and mix it well.
    3. Cover the bowl with a lid and keep it aside for at least 15 minutes or till your yeast mix turns frothy and bubbly.
    4. Now take a Big bowl and add All Purpose flour.
    5. Add soft butter and mix it well with your fingers.
    6. Now add your yeast concoction gradually in the dry flour.
    7. Do not put all the wet yeast concoction.
    8. Add slowly and start kneading the dough.
    9. The dough should not be very soft neither too hard.
    10. Punch and stretch the dough for about 5 minutes.
    11. Now take a cling film and cover the dough with it and keep it for 1 hour or till the dough rises up.( mine dough has risen up in 1/2 an hour it depends on the yeast you are using)
    12. After 1 hour knead and punch the dough again and spread some dry flour on your kitchen slab.
    13. Take a roller pin and start rolling the dough in a rectangular shape about 1 cm thick or 1/3 of an inch.
    14. Now spread your chocolate spread and roll up from the long side of the rectangle.
    15. After this step cut through the centre of the roll and twist each side over the other.
    16. Bring the two ends of the twisted bread together and seal the ends.
    17. Now take a bread tin and grease it with some butter.
    18. Pre-Heat the oven at 200 degrees for 10 minutes.
    19. Now keep your tin in the oven and bake it at 200 degrees for 30 minutes.
    20. After 30 minutes take the tin out and give a milk wash to your bread by applying little milk with a brush on the bread and again keep it in the oven for more 10 minutes.
    21. After 10 minutes take the tin out and let the bread cool down.
    22. Take out your Babka Bread and enjoy.

    Thursday, 27 December 2018

    Manchow Soup

    Manchow Soup

    Winters are incomplete without soup.Soup gives a warmth feeling in chilling cold.Sometimes we get bored of having the same healthy soup like spinach , tomato and the basic corn soup :-( So to have some chatpata on your taste buds do try this spicy and tangy Manchow Soup.
    This soup is healthy too because it contains veggies and your children would love eating these veggies in hot soup.


    The aroma of garlic and ginger adds a yum aromatic flavour to the soup and this soup will give a warmth to your body.Ginger and garlic both acts a medicine because they help us to fight cough and cold which we get very frequently in winters.
    Manchow soup is incomplete with Chow :-D yes chow means chowmein .I have added some fried hakka noodles to get a crunch in your mouth.
    Normally we enjoy this soup in restaurants but i have tried this at home and believe me my family members were saying that this soup is far much better than the outside soup.Yes this soup takes little efforts and time to make but the result you will get after relishing this crunchy soup,you will find it worth while making it.


    So if you also want to cherish your chilli weather at home by relishing this palatable Manchow Soup then you must give a try to this-

    Ingredients-

    For fresh vegetable stock

    1. Water - 1 litre
    2. 2 carrots - finely chopped
    3. 1/2 a cup cabbage - finely chopped
    4. 1 onion -finely chopped
    5. 1/2 a cup -Coriander stems 
    Hakka noodles -100 grams (boiled)
    Cornflour powder - 1 tbsp

    For soup -
    1. Oil - 1 tbsp
    2. Ginger 1 inch - grated
    3. Garlic 2 tbsp - finely chopped
    4. Green Chillies - 2 to 4 (finely chopped)
    5. Medium sized onion -1 (finely chopped)
    6. Carrot -1 (finely chopped)
    7. Cabbage - 1/4 cup (finely chopped)
    8. Baby Corns - 4 pieces (cut it into small pieces)
    9. Freshly chopped coriander leaves
    10. Salt as per taste
    11. Pepper powder - 1 /2 tsp
    12. Soya Sauce - 1 tbsp
    13. Red chiili sauce - 1 tsp
    14. Sugar - 2 pinches
    15. White vinegar - 1/2 tsp
    16. Cornflour -2 tbsp
    17. Water - 2 tbsp


    Method -
    1. Take a pan add water.
    2. Heat it up and add veggies 

    1. 1 cup cabbage - finely chopped
    2. 1 onion -finely chopped
    3. 1/2 a cup -Coriander stems 
    4. 2 carrots finely chopped
    Now cover the pan with a lid and boil it on slow flame till 20 minutes.


    1.Now take a kadhai add oil for deep frying the noodles.
    2.Heat up the oil.
    3.Take the noodles and coat them with dry cornflour powder.
    4.Fry the noodles in batches.
    5.Fry till they turn golden in colour and keep them on an absorbent paper.
     Now after 20 minutes strain the veggies and keep its water in a bowl.Your fresh stock is ready.

    For the Soup
    1.  Take a wok add oil and add garlic and ginger.
    2. Add onions and stir it well.
    3. Add green chillies also and mix it well.
    4. Fry it for few minutes till it starts changing its colour.
    5. Now add baby corns,cabbage,carrots and add salt and sugar in it.
    6. Stir it again
    7.  Now add -
    8. Pepper powder 
    9. Soya Sauce 
    10. Red chilli sauce 
    11. Add 1 cup stock in it.
    12. Now go for a good boil.
    13. Take a cup add cornflour powder and water in it.Mix it well.
    14. Add this mix in the soup.
    15. Give a good stir to avoid lumps.
    16. Now add the rest of the stock.You can add more water if needed.
    17. Again go for a boil and add white vinegar in the soup.
    18. Lastly add some freshly chopped coriander leaves.
    19. Your hot and sour Manchow Soup is ready.
    20. Serve it with crispy fried hakka noodles separately.


    Sunday, 16 December 2018

    kheel namkeen

    Kheel Namkeen
    After Diwali your parshad is still in your kitchen and you are worried how to use it?Kheel Namkeen can solve your problem.
    This kheel Namkeen is made up from my leftover parshad which i have bought for Diwali pooja. But after the pooja no one in my house was ready to eat it :-(  ,but i can't throw this kheel because i  have purchased  it for pooja parsadam. Now what to do ?


    Kheel Namkeen a guilt free and healthy munchies you can have with your cuppa of tea or for a sudden hunger pangs.This namkeen is very crispy and light in spice,as kids can also enjoy them.You can give these kheel in your kids tiffin boxes.
    This Namkeen is prepared in very less oil and the crunchiness of peanuts is adding an aromatic flavour to it.
    When you are feeling hungry and you want to have a light snack which can fill your tummy also,then this namkeen is the best option.


         Here goes the crunchy munchy recipe of Kheel Namkeen-
    Ingredients -

    1. Kheel - 200 grams
    2. Peanuts - 1 cup
    3. Salt as per taste
    4. Curry leaves - 7 to 8
    5. Sugar - 1/4 tsp
    6. Turmeric powder -1/4 tsp
    7. Dry mango powder - 1/2 tsp
    8. Red chilli powder as per your taste(optional)
    9. Oil - 1 1/2 tsp
     Method -
    1. Take a wok add oil and heat it up.
    2. Now add peanuts and fry them till it changes its colour and turns crispy.
    3. Now add curry leaves and let it splutter.
    4. Add salt,turmeric powder,sugar,dry mango powder and sugar.
    5. You can add chilli powder also its up to you.
    6. Stir it well and add kheel in it.
    7. Mix it up well on slow flame.
    8. Stir it for 5 to 6 minutes.
    9. Turn off the flame and let it cool down.
    10. Now you can keep your Namkeen in an airtight container.
    11. Enjoy.

    Monday, 3 December 2018

    Pyaz Ki Kachori

    Pyaz Ki Kachori

    Winters are meant for eating fried food :-P , to enjoy them fully i have made these yummy kachoris.
    These kachoris are far much better from market bought because they are made from hygienic oil and of course home made food is the best.Deep fried kachoris with tea is your best pal in this season.

     The stuffing i have used to fill the kachoris is little sweet,salty and tangy.Some added spices is enhancing its taste.I have also mentioned some tips and tricks which is going to make your kachori just perfect .
    You can keep these kachoris in an air tight container for at least 5 to 6 days in winters and it will remain fresh.So enjoy these kachoris with your cup of tea :-D 


    Here goes the recipe with some tricks with pics -

    Ingredients -
    For Dough
    1. 2 cups all purpose flour
    2. 1 tbsp semolina
    3. Salt 1 tsp
    4. Desi ghee - 2 tbsp
    5. Water as required for kneading the dough
    For stuffing-
    1. Onions - 2 medium sized (roughly chopped)
    2. Ginger paste - 1/2 tsp
    3. Fennel seeds - 1 tsp
    4. Gram flour - 2 tbsp (for binding and taste both)
    5. Salt as per taste
    6. Dry mango powder - 1 tsp
    7. Sugar - 1/4 tsp
    8. Red chilli powder -1/4 tsp (optional)
    9. Coriander powder - 1 tsp
    10. Turmeric powder -2 pinches
    11. Raisins - 7 to 8 pieces
    12. Refined oil - 1 tbsp

    Method -
    1. Take a bowl add apf,semolina and salt and mix it well.
    2. Now add ghee in it.
    3. Mix it really well with your fingers.
    4. HOW to check the right form that how much ghee needs to be added ?Check this picture-
    As you can see a good shaped lump with only dry ingredients and ghee,So if you are able to form this it means that now you can add water and knead the dough.


    See the dry ingredient lump is shown in the picture.
    So gradually start adding water and make a normal dough nor too soft neither very hard.
    Knead the dough for at least 7 to 8 minutes.

    5 . Now keep the dough for rest for 15 minutes by covering it with a cloth or plate.
    6. For stuffing-
    7.Take a wok add oil and heat it up add fennel seeds .
    8.Now add onions and saute it till it turns little pink in colour.Add ginger paste now and stir it well.Add besan also and roast it for few minutes.
    9.Now add turmeric powder,salt,sugar,coriander powder,dry mango powder and red chilli powder.
    10.Mix it well and you will be able to feel the aroma of spices.
    11.Saute it for more 5 minutes and add raisins.Switch off the flame and let the masala to cool down.
    12.Now take a wok add oil for frying the kachoris.
    13.Take your dough and knead it again and take a round ball from it.
    14.Roll the ball with rolling pin and make it little flat and fill around 1 tsp or 1 1/2 tsp filling in it.
    15.Fold the sides gently like we do for making stuff paranthas.
    16.And spread the ball little bit with the help of your palm.
    17.Now keep the flame low and put the kachori in the oil.
    18.Fry the kachories from low to medium and then little high flame.
    19.Fry them till they turn little golden in colour(Do not over fry them at once)
    20.Take them out and make other kachoris too.
    21.Now fry the first batch again(double frying method will make your kachori more crispy)Fry till it turn proper golden brown in colour.
    Place the kachoris on an absorbent paper.
    22.Now let your kachoris cool down completely and fill them in an air tight container or if you want to eat all at one time,then enjoy them with ketchup or green chutney.
    23.Mmmmm My mouth is already watering ;-) ,so please try out these Pyaz ki kachori and enjoy every bite of it.


    Chili Garlic pasta

    Chili Garlic Pasta Aaj khane me kya hai Mama...kya chahiye Miss Drama :-P ?Pasta...You have enjoyed this advertisement with your kids,and ...